MacBook Pro 2018 Updates

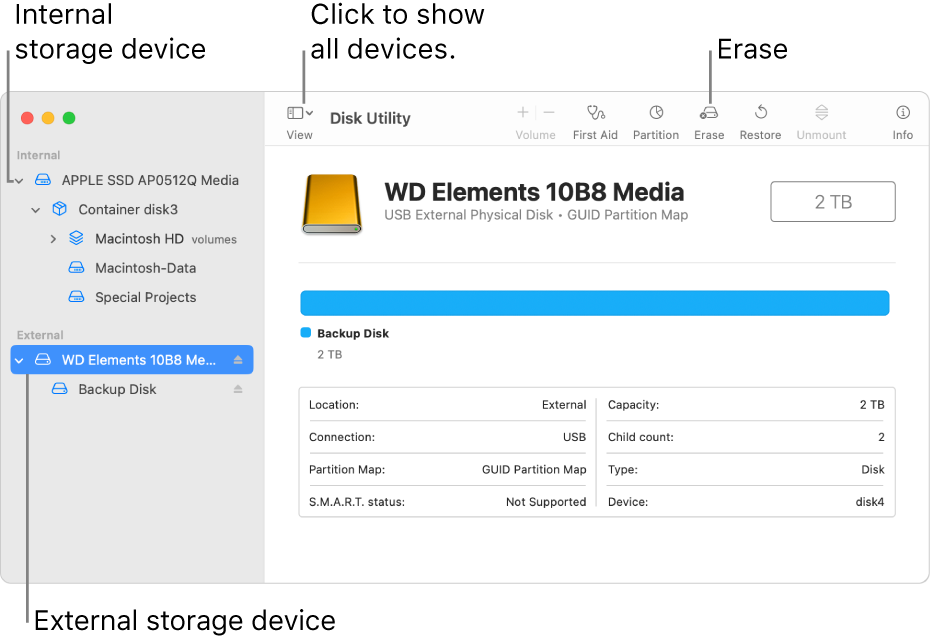
I have a MacBook Pro 2018 with High Sierra 10.13.6 installed. It is formatted as an Extended? I am trying to bring it up to speed with updates. I thought I'd have to update in chronological order starting with Mojave. When I went to install Mojave I got "This mac can only install macOS on APFS-formated drives. Please use Disk Utility to reformat as APFS." Now what do I do? Thanks in advance....

MacBook Pro 13″, macOS 10.13

Posted on Aug 16, 2023 08:10 PM

Reply
Question marked as Top-ranking reply

Posted on Aug 19, 2023 07:05 AM

Any and all credits below to the Author of below method tbirdvet


CONVERTING TO APFS - Apple Community


" It is not mandatory. If you upgrade to Catalina it will reformat to APFS automatically. If you want your internal drives to be APFS you can convert those by restarting your Mac by using Command + R to boot into recovery mode. Then, from Disk Utility>View>Show All Devices> Select your parent drive (or external) then click Edit and Convert to APFS. It will not impact your files. Before doing any conversion be sure you have a backup just in case. "


7 replies
Question marked as Top-ranking reply

Aug 19, 2023 07:05 AM in response to amtekel

Any and all credits below to the Author of below method tbirdvet


CONVERTING TO APFS - Apple Community


" It is not mandatory. If you upgrade to Catalina it will reformat to APFS automatically. If you want your internal drives to be APFS you can convert those by restarting your Mac by using Command + R to boot into recovery mode. Then, from Disk Utility>View>Show All Devices> Select your parent drive (or external) then click Edit and Convert to APFS. It will not impact your files. Before doing any conversion be sure you have a backup just in case. "


Aug 17, 2023 04:06 PM in response to amtekel

Hello amtekel,


Welcome to Apple Support Communities. There are different file system formats supported by Disk Utility on your Mac. To get started, please review the information in the following link to understand the difference between these formats, and which macOS versions they support:


File system formats available in Disk Utility on Mac


If you would like to update your Mac to the latest macOS Ventura, please follow the steps here:


How to upgrade to macOS Ventura


Make sure you have a backup of your data before updating as mentioned in the link above.


We hope this information is useful. Kind regards.


Aug 18, 2023 03:02 PM in response to amtekel

Hi amtekel,


In reference to your question, you would have to format to Apple File System (APFS) in order to install macOS Ventura. APFS is the default file system needed for macOS 10.13 or later. Please keep in mind that formatting would erase the data in your current storage. It's recommended to create a back up of your data. For directions on formatting your storage, you can follow these steps:


Erase and reformat a storage device in Disk Utility on Mac

In Disk Utility on Mac, you can erase and reformat storage devices to use with your Mac. Erasing a storage device deletes everything on it.

A Disk Utility window showing two storage devices in Show All Devices view.
1. If you have any files you want to save, copy them to another storage device.
2. Open the Disk Utility app  on your Mac using one of the following methods, depending on the type of disk or volume you want to erase:

* If you want to erase your startup disk: Start up your computer in macOS Recovery, then choose Disk Utility in the Recovery app. To learn how to start up your computer in macOS Recovery, see Intro to macOS Recovery.

* Note: If you want to get your Mac ready to trade in, sell, or give away, and your computer is a Mac with Apple silicon or an Intel-based Mac with an Apple T2 Security Chip, use Erase Assistant.

* If you want to erase any other type of storage device: Double-click Disk Utility in the /Applications/Utilities folder.

3. Choose View > Show All Devices.
4. In the sidebar, select the storage device you want to erase, then click the Erase button .

5. Click the Scheme pop-up menu, then choose GUID Partition Map.
If the Scheme pop-up menu isn’t available, make sure you selected the storage device you want to
erase—it’s at the top of the hierarchy.

6. Click the Format pop-up menu, then choose a file system format.

7. Enter a name.

8. (Optional) If available, click Security Options, use the slider to choose how many times to write over
the erased data, then click OK.

Secure erase options are available only for some types of storage devices. If the Security Options
button is not available, Disk Utility cannot perform a secure erase on the storage device.

9. Click Erase, then click Done.

Following these steps will help you on the path to formatting your storage and having the ability to update your Mac to macOS Ventura. These steps are outlined in this article: Erase and reformat a storage device in Disk Utility on Mac - Apple Support


Kind regards.

This thread has been closed by the system or the community team. You may vote for any posts you find helpful, or search the Community for additional answers.

MacBook Pro 2018 Updates

Welcome to Apple Support Community
A forum where Apple customers help each other with their products. Get started with your Apple Account.