Wireless Sync
Why is my Mac not able to sync with my family’s iOS devices wirelessly, though they’re recognized and synced over usb perfectly fine. This wasn’t an issue until I updated to Ventura 13.1
MacBook Air 13″, macOS 13.1
Why is my Mac not able to sync with my family’s iOS devices wirelessly, though they’re recognized and synced over usb perfectly fine. This wasn’t an issue until I updated to Ventura 13.1
MacBook Air 13″, macOS 13.1
Hello Familylife5673,
Welcome to Apple Support Communities.
We understand that your family is no longer able to wirelessly sync since updating to the most recent macOS version. We are happy to help.
Please use the steps to restart your Mac: Shut down or restart your Mac - Apple Support
"Restart your Mac
Once your Mac has fully restarted, please try the steps here to wirelessly sync content: Sync content between your Mac and iPhone, iPad, or iPod touch over Wi-Fi - Apple Support

If you connect your device to your Mac using a USB cable and don’t see the device in the Finder sidebar, see If your device doesn’t appear in the sidebar.
3. Click General in the button bar.

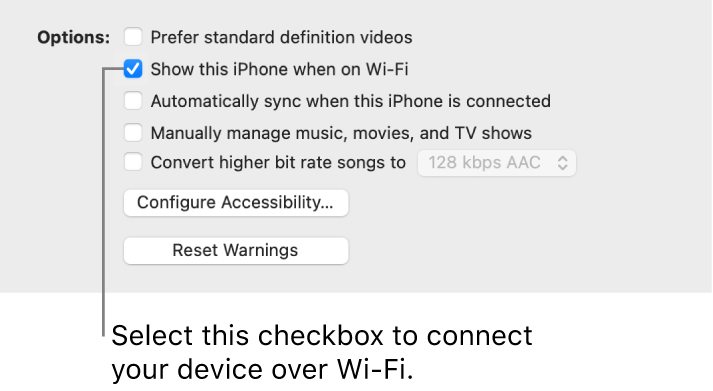
4. Select the “Show this [device] when on Wi-Fi” checkbox.
5. Use the button bar to turn on and select sync settings.
6. Click Apply."
If no resolution, we recommend some isolating troubleshooting steps. Please use the steps to test in safe mode: How to use safe mode on your Mac - Apple Support
"Apple silicon
Intel processor
Let us know if you have further questions.
Take care.
Hello Familylife5673,
Welcome to Apple Support Communities.
We understand that your family is no longer able to wirelessly sync since updating to the most recent macOS version. We are happy to help.
Please use the steps to restart your Mac: Shut down or restart your Mac - Apple Support
"Restart your Mac
Once your Mac has fully restarted, please try the steps here to wirelessly sync content: Sync content between your Mac and iPhone, iPad, or iPod touch over Wi-Fi - Apple Support
If you connect your device to your Mac using a USB cable and don’t see the device in the Finder sidebar, see If your device doesn’t appear in the sidebar.
3. Click General in the button bar.
4. Select the “Show this [device] when on Wi-Fi” checkbox.
5. Use the button bar to turn on and select sync settings.
6. Click Apply."
If no resolution, we recommend some isolating troubleshooting steps. Please use the steps to test in safe mode: How to use safe mode on your Mac - Apple Support
"Apple silicon
Intel processor
Let us know if you have further questions.
Take care.
@1ssmith
I just created another user on my Mac and followed the instructions given. It worked. So, I'm assuming the problem is with my original user account. How can we fix that?
Hi Familylife5673,
Please continue with creating a new user account on your Mac. Testing in a new user will tell us if user specific permission issues may keep Safari from properly deleting history automatically. Be sure to log out of your current user account completely before testing in the new account.
1. On your Mac, choose Apple menu> System Settings, then click Users & Groups
in the sidebar. (You may need to scroll down.)
2. Click the Add Account button below the list of users on the right (you may be asked to enter your password.)
3. Click the New Account pop-up menu, then choose a type of user.
• Administrator: An administrator can add and manage other users, install apps, and change settings. The new user you create when you first set up your Mac is an administrator. Your Mac can have multiple administrators. You can create new ones, and convert standard users to administrators. Don’t set up automatic login for an administrator. If you do, someone could simply restart your Mac and gain access with administrator privileges. To keep your Mac secure, don’t share administrator names and passwords.
• Standard: Standard users are set up by an administrator. Standard users can install apps and change their own settings, but can’t add other users or change other users’ settings.
• Sharing Only: Sharing-only users can access shared files remotely, but can’t log in to the computer or change settings. To give the user permission to access your shared files or screen, you may need to change options in File Sharing, Screen Sharing, or Remote Management settings. See Set up file sharing and Share the screen of another Mac.
For more information about the options for each type of user, click the Help button in the lower-left corner of the dialog.
4. Enter a full name for the new user. An account name is generated automatically. To use a different account name, enter it now—you can’t change it later.
5. Enter a password for the user, then enter it again to verify. Enter a password hint to help the user remember their password.
6. Click Create User.
7. Depending on the type of user you create, you can also do any of the following:
• For an administrator, select “Allow user to administer this computer.”
• Select “Allow user to reset password using Apple ID.” To use this option, the user must have set up iCloud on this Mac. However, this option isn’t available if is FileVaultis turned on and set to allow the user to reset their password at startup using their Apple ID.
• Use Sharing settings to specify whether the user can share your files and share your screen.
The article provides more information about user accounts: Add a user or group on Mac
While logged in to the new user account, try connecting the iOS devices wirelessly.
Regards.
Any Third Party Applications that will interfere with the normal operation of the OS, is an invitation for disaster and comprise the Operating System
Certain Applications maybe available on the Apple Apps Store - this only means the Developer is prepared to pay Apple a portion on each sale. What the Application may do to the computer is up to the User to check this out before purchase
Any of the below should be removed as per Developers Instructions
This will include CleanMyMac , This will include BitDefender ,
This will included Norton Antivirus , Sophos Av Software
Intego AntiVirus, McAfee, MacKeeper, Avast AntiVirus
Ad Guard, Webroot , ESET , Avira , Dr Cleaner Pro Plus
Read some of the posting and arrive at your own conclusions.
The The Built in Security is all that is required.
To sync wirelessly would require as per the links below
Sign in to iCloud on all your devices - Apple Support (CA)
How iCloud keeps information up to date across all your devices - Apple Support (CA)
Apps and features that use iCloud - Apple Support (CA)
I tried this in regular mode and also in "safe mode". My ios device is still not connecting wirelessly with my Mac.
I just created another user on my Mac and followed the instructions given. It worked. So, I'm assuming the problem is with my original user account. How can we fix that?
Why am I not receiving any other steps after responding to this. The problem is still there and I need to know what to do now.
Wireless Sync
