Hello NektoMozg,
Thanks for choosing the Apple Support Communities. It sounds like the OS is having a hard time installing to your hard drive. In this instance, it may be a good step to ensure you have partitioned the hard drive and created a Macintosh HD partition. After that, you can try to install macOS Mavericks, then move your way up to the latest version of your choice. Here is how.
Partition a physical disk in Disk Utility on Mac - Apple Support
"Add a partition
Important: As a precaution, it’s best to back up your data before creating new partitions on your device.
- In the Disk Utility app
 on your Mac, select a volume in the sidebar, then click the Partition button
  in the toolbar.
 - If Disk Utility isn’t open, click the Launchpad icon
 in the Dock, type Disk Utility in the Search field, then click the Disk Utility icon .
 - If you have multiple storage devices connected to your Mac, make sure you select a volume that’s on the device you want to partition.
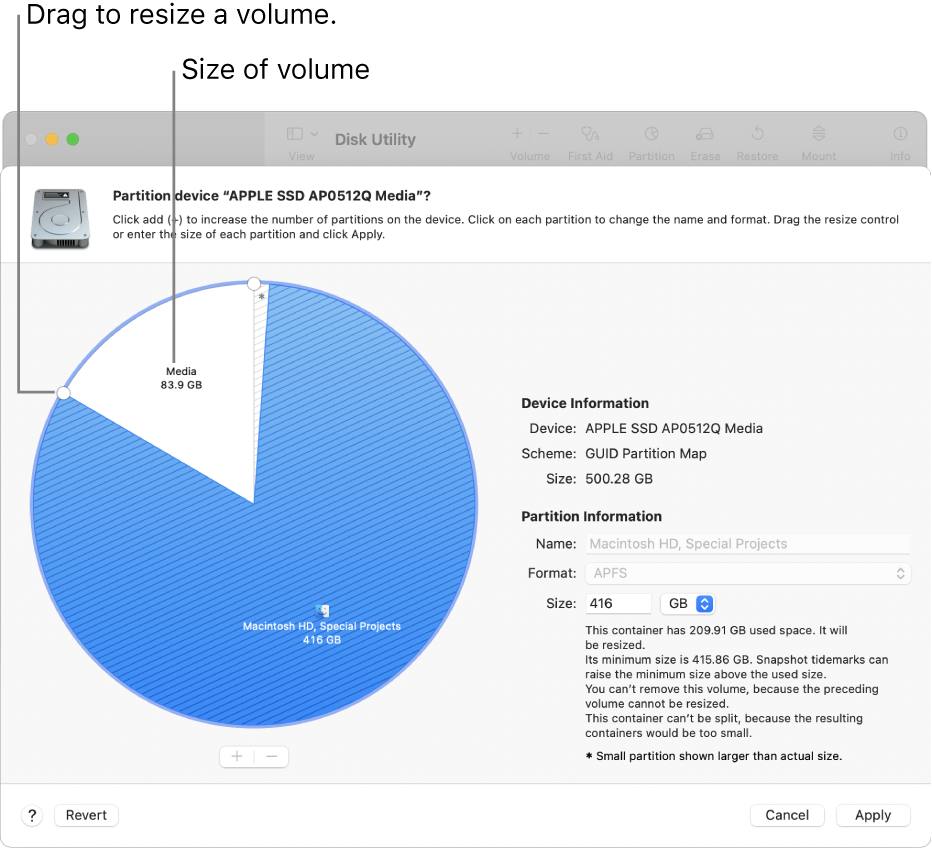
- When you select a volume that already has data on it, the pie chart shows a shaded area representing the amount of data on the volume and an unshaded area representing the amount of free space available for another volume. Disk Utility also shows whether the volume can be removed or resized.
- Note: If you see a small volume with an asterisk, the partition is smaller than can be represented at the correct scale in the chart.
- Click the Add button
 below the pie chart.
 - Read the information in the dialog that appears, then click Add Partition.
- Note: If you click Add Volume instead, you can click the Add button to create an additional APFS volume in the container, or click Cancel to return to the Disk Utility window without making any changes to the storage device.
- Type a name for the volume in the Name field.
- For MS-DOS (FAT) and ExFAT volumes, the maximum length for the volume name is 11 characters.
- Click the Format pop-up menu, then choose a file system format.
- Enter the size or drag the resize control to increase or decrease the size of the volume.
- Click Apply.
- Read the information in the Partition Device dialog, then click Partition.
- If a dialog appears that indicates it will take a long time to resize the startup volume, read the information in the dialog, then do one of the following:
- If you want to proceed with partitioning the disk, click Continue.
- If you don’t want to proceed with partitioning the disk, click Cancel.
After the operation finishes, click Done.
After you partition a storage device, an icon for each volume appears in both the Disk Utility sidebar and the Finder sidebar."
Once finished, try following these steps to reinstall macOS: How to reinstall macOS - Apple Support
"Turn on your Mac and immediately press and hold Command (⌘)-R until you see an Apple logo or other image.
When you install macOS from Recovery, you get the current version of the most recently installed macOS, with some exceptions:
- On an Intel-based Mac, you can use Shift-Option-Command-R during startup to be offered the macOS that came with your Mac, or the closest version still available. Or you can use Option-Command-Rduring startup to be offered either the latest macOS that is compatible with your Mac, or in some cases the macOS that came with your Mac or the closest version still available.
- If the Mac logic board was just replaced, you might be offered only the latest macOS that is compatible with your Mac.
- If you just erased your entire startup disk, you might be offered only the macOS that came with your Mac, or the closest version still available.
You can also use these methods to install macOS, if the macOS is compatible with your Mac:
We hope this helps.
Cheers!
