Creating a bootable USB installer

I erased my old MacBook pro before creating a bootable USB installer, and although I've downloaded El Capitan onto a USB, it can't seem to be found using the terminal language included by Apple. I've read through blogs and watched videos on creating the bootable installer, and I'm wondering if I was supposed to install it - as in unpackaged it completely - on a different Mac before moving it to the USB. I'm also wondering if there's a way to alter the Terminal language so it doesn't have to come through an Applications pathway, because I can't see how the computer will recognize that on the USB.

Any help is super appreciated. I just need to know if I can reinstall El Capitan to the computer, given that it has nothing at all on it right now.

Thanks

MacBook Pro

Posted on Dec 11, 2022 10:56 AM

Reply

Similar questions

7 replies

Dec 14, 2022 05:12 PM in response to gcahill

gcahill,


Thanks for taking a look at those previous steps.


Just to confirm, you previously stated that you downloaded the macOS El Capitan installer directly to the USB drive, was that correct? If so, to create the bootable installer, the El Capitan installer would need to be downloaded to the Mac you're creating the bootable installer from before running the Terminal commands.


If the installer is downloaded to your Mac, and you continue to get the same errors, we'd recommend reaching out to Apple Support directly from this link here: Get Support - Apple


Cheers!

Dec 13, 2022 04:18 PM in response to gcahill

Hello gcahill,


You came from the best resource for your questions: Create a bootable installer for macOS - Apple Support


As mentioned there, see the following information:


What you need to create a bootable installer

USB flash drive or other secondary volume with at least 14GB of available storage, formatted as Mac OS Extended.

Installer for OS X El Capitan or later. To get the full installer, your Mac must be using the latest version of OS X El Capitan, the latest version of macOS Sierra, or any later version of macOS.

Download from a Mac that is compatible with the macOS you're downloading. Enterprise administrators: download from Apple, not a locally hosted update server. 

Download macOS

Use Terminal to create the bootable installer

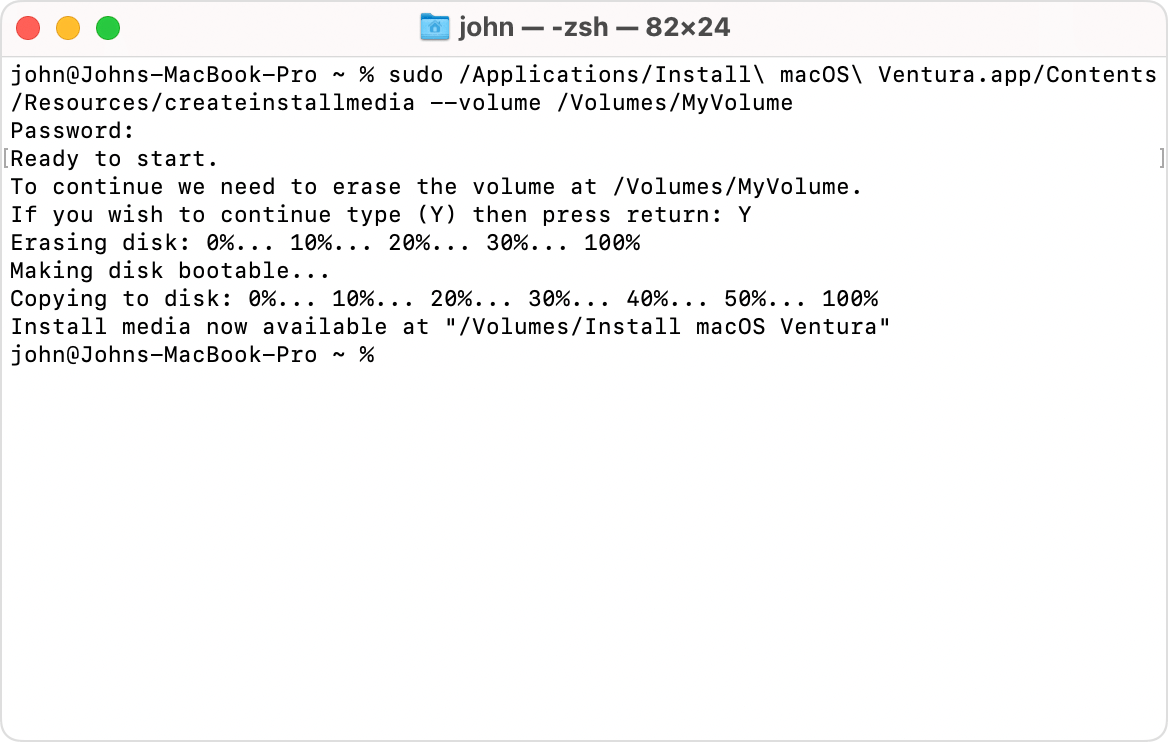
Terminal window showing the completed process 

1. Plug in the USB flash drive or other volume that you're using for the bootable installer. 

2. Open Terminal, which is in the Utilities folder of your Applications folder.

3. Type or paste one of the commands below into Terminal, then press Return to enter the command. Each command assumes that the installer is in your Applications folder, and MyVolume is the name of the USB flash drive or other volume you're using. If the volume has a different name, replace MyVolume in the command with the name of your volume.

4. When prompted, type your administrator password. Terminal doesn't show any characters as you type. Then press Return.

5. When prompted, type Y to confirm that you want to erase the volume, then press Return. Terminal shows the progress as the volume is erased.

6. After the volume is erased, you may see an alert that Terminal would like to access files on a removable volume. Click OK to allow the copy to proceed. 

7. When Terminal says that it's done, the volume will have the same name as the installer you downloaded, such as Install macOS Monterey. You can now quit Terminal and eject the volume.

Commands

Depending on which macOS you downloaded, enter one of the following commands in Terminal as instructed above.

If your Mac is using macOS Sierra or earlier, the command should conclude with --applicationpath followed by the appropriate installer path, as shown in the command below for El Capitan.

El Capitan
sudo /Applications/Install\ OS\ X\ El\ Capitan.app/Contents/Resources/createinstallmedia --volume /Volumes/MyVolume --applicationpath /Applications/Install\ OS\ X\ El\ Capitan.app
 
Use the bootable installer

Determine whether you're using a Mac with Apple silicon, then follow the appropriate steps:

Intel processor

1. Plug the bootable installer into a Mac that is connected to the internet and compatible with the version of macOS you're installing. (A bootable installer doesn't download macOS from the internet, but it does require an internet connection to get firmware and other information specific to the Mac model.)

2. Turn on your Mac, then immediately press and hold the Option (Alt) key.

3. Release the Option key when you see a dark screen showing your bootable volumes.

4. Select the volume containing the bootable installer. Then click the onscreen arrow or press Return. 

If you can't start up from the bootable installer, make sure that Startup Security Utility is set to allow booting from external or removable media.

5. Choose your language, if prompted.

6. Select Install macOS (or Install OS X) from the Utilities window, then click Continue and follow the onscreen instructions.


You wouldn't need to open the installer on the newer Mac, where it's downloading. You should be able to simply download it and use the Terminal commands above to create the bootable USB installer.


Also, you'd need to start up the older Mac holding down the Option key on your keyboard to see the bootable USB installer.


Let us know if this helps out, take care.

Dec 14, 2022 03:09 PM in response to karina184

Hi again, thanks for your guidance. I have tried creating the bootable USB installer but with no success. I'm running Monterey 12.6.1 on my new M2 MacBook Air, so I tried first not including the --applicationpath element. After entering the text, I'm prompted for a password and it simply says, command not found.

This is a direct paste:

sudo /Applications/Install\ OS\ X\ El\ Capitan.app/Contents/Resources/createinstallmedia --volume/Volumes/MyVolume

Password:

sudo: /Applications/Install OS X El Capitan.app/Contents/Resources/createinstallmedia: command not found


I also tried adding the --applicationpath /Applications/Install\ OS\ X\ El\ Capitan.app with no success.


Can you see anything wrong with how I've typed it in or can you suggest what might be wrong? The USB is erased and is formatted as Mac OS Extended (Journaled). There's more than 60GB available on it.


Thanks for any advice.


Dec 21, 2022 07:11 AM in response to gcahill

You can only extract the macOS 10.11 installer from downloaded .dmg file on a Qualifying Mac since the mounted .dmg file contains a .pkg file which is an app that extracts the real installer from within the .pkg file and places the real installer into the Applications folder. Unfortunately you cannot create a bootable macOS 10.11 USB installer on an M1/M2 Mac with Apple Silicon even if you have extracted the real installer. You will need access to another Qualifying Mac which for macOS 10.11 will generally be a Mac from 2008 to 2015.


What is the exact model of the Mac? You can get this information by entering the system serial number here:

Check Your Service and Support Coverage - Apple Support


If you don't have access to another Qualifying Mac and you cannot boot into recovery mode using Command + Option + R (If you can boot to recovery mode, then you will likely need to change the system date in order to install macOS due to outdated certificates), then your only other option will be to use an OS X 10.6 Snow Leopard DVD. We need to know the exact model of the Mac in order to know which DVD you need. Theoretically you should have this DVD, but if you do not, then you will need to try to find one for sale online.


This thread has been closed by the system or the community team. You may vote for any posts you find helpful, or search the Community for additional answers.

Creating a bootable USB installer

Welcome to Apple Support Community
A forum where Apple customers help each other with their products. Get started with your Apple Account.